Twitter Updates

    follow me on Twitter

    Sunday, June 13, 2010

    Rose Cakelets

    There is this beautifiul rosebud mini cakes that I have always wanted to try after reading it from my Rose's Heavenly Cakes book.  The only problem is I do not have any Nordic Ware Sweetheart Rose pan.  So, it is a happy surprise when I found that Phoon Huat, a local baking supply store, do sell rose pan though in silicon only.  They only had stock for the mini cakelets pan which goes for $15 while the larger cake pans at about 6 nos. per pan is sold out at $19/pan.  Needless to say, I spring on this purchase plus top up my unsalted butter supply.


    The pan looks like this and is real pretty! *SMILE*


    Couple of things - though the recipe is chocolate cake, I left out the cocoa mixture and the ganache centers for the sake of my family's throats.  The weather is getting warmer and chocolate is extremly heaty.  My mum had made chrysanthemum tea for all of us to cool down.  Oh, the sugar is also reduced by 50%.  Do add more for those of you with sweet tooth.  As the single recipe only yields about 20 mini cakelets and this quantity is way too little for sharing with my family and friends, seeing how pop-in-the-mouth-friendly it is, I doubled it to get 40 cakelets.  Up to date I still cannot find my Kitchenaid K-beater so the mixing had been manual for the last few cakes including this.  If anyone knows where I could buy the K-beater, do let me know.

    Recipe (makes approx 20 mini cakelets)
    2 large yolks weighing 37g
    1 1/2 tbsp water
    3/4 tsp pure vanilla extract
    78g plain flour
    50g caster sugar
    1 tsp double acting baking powder
    1/4 tsp salt
    71g unsalted butter at room temperature

    1.  Preheat the oven at 170 deg with the tray at the lower third position.

    2.  In a bowl, mix slightly the egg yolks, 1 1/2 tbsp water and vanilla essence.

    3.  In another larger bowl, whisk the flour, sugar, baking power and salt.  Add the butter and mix till well combined.

    4.  Add the egg mixture in 2 batches to the dry ingredients, ensuring that the batter is well mixed each time. 


    5.  Spoon the batter, filling the pans half full.

    6.  Bake for 12 to 13 minutes or when the cakes spring back when you touch them with a fingertips.

    7.  Remove from the pan and cool on wire rack.


    Troubleshooting
    Now, I would not proclaim to be an expert in baking; just someone who enjoys it and wants to share my passion with the people I love.  With this cakelets, this is the 2nd time I have encountered dome or cracked surface with tunnels.  My dear pal, Lily had commented that my oven is too hot and rightly so I agree.  The only puzzling thing is both of our ovens are the same - Rowenta and hers at 175 deg gave perfect chocolate cupcakes. 

    Anyhow, my take is my oven is too hot and will reduce to 160 deg the next time.  I could have overmixed the batter a tad more too.  Taste wise, they passed and I loved them still!  Hee. 

    For other troubleshooting tips, refer to Joy of Baking

    Saturday, June 12, 2010

    Chocolate Cupcakes

    After weeks of baking full sized cakes, I was roused to try cupcakes when my gal fren raved about the success she had with a recipe in Rose Levy's latest book, "Rose's Heavenly Cakes".  You see, each of us had the same book so it is easy to exchange tips. 

    During last sun, I tried it and yes, it was super easy, soft, very chocolately and proved to be popular too.  I used Varlhona's cocoa powder, available from 360 deg Marketplace at ION or Shermay Lee's Cooking School.  For quick warming of the eggs, immerse them in hot water for about 10 mins. 

    Here's the recipe with reduction in sugar and butter.

    Recipe
    43g unsweetened (alkalized) cocoa powder
    118g boiling water
    2 large eggs, at room temperature
    3 tbsp water
    1.5 tsp pure vanilla essence (mine is from Nielman Massey)
    166g cake flour (or bleached all-purpose flour)
    150g caster sugar
    2 tsp baking powder
    1/8 tsp baking soda
    1/2 tsp salt
    150g unsalted SCS butter at room temperature
    paper cupcases

    1.  Mix boiling water with cocoa powder till smooth.  Cover with cling wrap and allow to cool to room temperature, about 30 minutes.  Cool in the refrigerator for faster cooling.

    2.  While waiting for the cocoa mixture to cool, prepare the wet ingredients. Mix together eggs, 3 tbsp water and vanilla till lightly combined.

    3. Whisk flour, sugar, baking powder, baking soda and salt in another bowl to form the dry ingredients.

    4.  When the cocoa mixture is cooled, preheat the oven at 175 deg with the rack at the lower third.

    5.  Add the butter and cocoa mixture to the dry ingredients and beat till moistened at low speed.  Increase the speed to medium and beat for 1.5 minutes. Scrape down.

    6.  In 2 phases, add in the egg mixture incorporating well after each time.

    7.  Using a porcelain soup spoon, scoop the batter onto the cup cases till 3/4 full.

    8.  Bake for 20 to 25 minutes or till a skewer comes out clean when inserted into the middle of the cupcake.

    9.  Leave to cool in the pan on the wire rack for about 10 mins.  Thereafter transfer the cupcakes to cool on the wire rack.  Store in room temperature up to 2 days when cooled completely.  Thereafter, store in the refrigerator. 

    Saturday, June 5, 2010

    No Bake Cheesecake

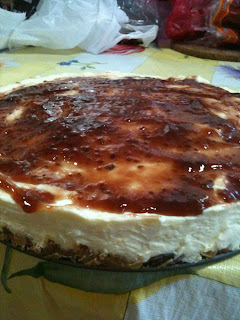
    Did my first no bake cheesecake and twittered about it.  Man was I excited when I first tried it on Mon evening.  Yup.  It was a weekday no doubt but I simply had the craving to do it!  It is really simple I discovered and super relaxed as the cake is done in 2 stages.  One thing I realised is the cake doubled as a ice cream when you freeze it overnight.  Try it! Your family and friends will love you for it. 

    For this recipe, I adapted it from Jamie Oliver's Ministry of Food. 

    Recipe
    130g SCS unsalted butter, softened at room temperature and cut into cubes
    200g digestive biscuits
    100g museli with oats
    1 tsp vanilla essence
    600g Philadelphia cream cheese, softened at room temperature and cut into cubes
    120g caster sugar
    1 lemon (separately zested and juiced)
    1 orange (zested)
    300ml whipping cream

    Topping
    Store bought raspberry & pomergranate jam

    Stage 1 - Cake Base
    1.  Grease 23cm springform cake tin with butter. 

    2.  Crumble digestive biscuits in a plastic bag using a rolling pin till fine bits.  Food processor can be used
    too.

    3.  Toast museli over low heat in a non-stick pan till it is slightly darker in colour and you can detect the fragrance. 

    4.  Toss the digestive biscuits and cubed butter into the pan and fold till thoroughly mixed.  Off the heat and smooth the mixture over the cake tin base.  Spread over evenly using a spatula and refrigerate for about an hour.  Do lower the refrigerator's setting if you need to quicken this step.

    Stage 2 - Cake
    1.  Mix cubed cream cheese with vanilla essence, lemon zest, lemon jucie, orange zest and sugar till they are nice and smooth. 

    2.  In another bowl, whisk the whipping cream till 'soft' peaks are obtained.  The peaks should hold their shapes when you stop whipping.

    3.  Add half of the whipping cream to the cream cheese mixture and fold in gently till well blended.  Repeat with the other half of the whipping cream.

    4.  Remove the cake tin from the refrigerator and pour the cake mixture over it.

    5.  Refrigerate or freeze overnight. 

    6.  The following morning, run a knife around the sides of the cake, release the catch of the springform and spread the jam over the top.  Cut and enjoy!

    Super Hydrating Toner

    The thing about maintaining ties with your gal frens is that whenever
    we meet we get to exhange tips about life when we are in a
    philosophical mood or fashion and skincare tips otherwise. My friend,
    L had totally peaches and cream complexion and remarked that the
    hydrating toner she uses twice a day from Hada Loda really works. What
    are the bunch of us to do when faced with such affirmative
    declaration? Succumb to it of course! And the timing is just perfect
    as this product had just been launched here. L bought hers in Hong
    Kong so she is way ahead of us! *smile*

    The brand is sold exclusively at Watsons so kudos to them. It is a
    drugstore item back in Japan and apparently it is super popular. In
    every 4 seconds, 1 bottle is sold. I bought mine during Vesak Day and
    had tried out for 3 days. So far, my skin had stayed matt longer and
    does not shine as frequently. I will try it out for the rest of this
    week to see how it holds up to airconditoned environment.

    It is Sat and my verdict is, *drum roll* please, it really works! My skin is softer and does not become oily so frequently.  Needless to say, I was blessed like heaven!
    Here is the pic.  Check it out people!